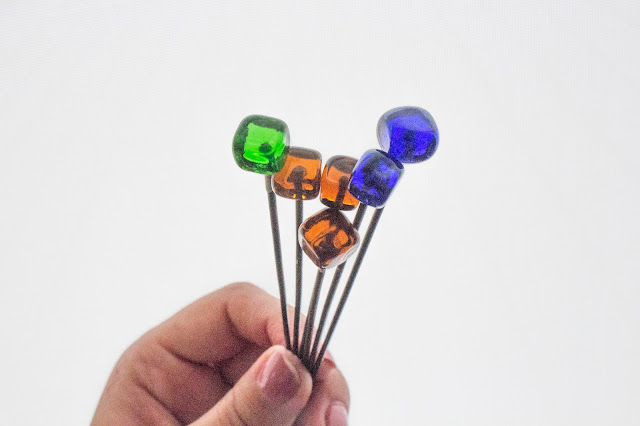
Fusing 104coe 1" square tiles [Part II]

 So, we figured the problem was actually that I had filled the kiln with three times as much material as the time I used the original schedule.

In the interest of time, I adjusted the schedule but continued firing with the three molds.  It went swell.

In the future, I might want to continue experimenting until perfection is achieved, but for the moment I have actually run out of scraps.  Could I use virgin material for this product?  Sure, probably... but I'm currently behind with commissions for things I know how to do well (including a painting), so I have to finish those first before launching into more experimentation.  I also see more profitable and satisfying to figure out how to make the blown beads again.  So, projects will be prioritized...


Fusing 104coe 1" square tiles [Part I]

I'm posting this mostly for myself than anything else.

Back in 2013 I melted these tiles, and took the notes that follow. 


rA1 = FULL
F = 1472
Hdl1 = .10
rA2 = FULL
F = 1292
Hdl2 = 0
rA3 = 320
F = 1004
Hdl3 = 1.00
rA4 = 248
F = 752
Hdl4 = 0

Then, upon attempting that schedule yesterday, I got the following results... 


I made twelve of them, and those 5 are the ones I decided to keep because I mean, they're adorable... here are all of them...


Anyway, lots of aesthetics but that wasn't the point of this post...  I didn't understand why they got hot enough to stick but didn't melt all the way down, especially since I was sure that the schedule I had used (successfully, as per the first picture) had been that one... I asked on LWE as well as the Lampwork Tips, Techniques, and Questions Facebook group, and the consensus was that I didn't allow the glass to soak for long enough at 1472.  Phill (SpeedSlug) on LWE gave me some notes I'm going to include below for future reference, and also Patti Cavill on Facebook.


So, using these notes I came up with the following schedule, which is in the kiln right now... I needed these tiles done this morning but alas, it is what it is.

rA1    =    FULL
F        =    1435
Hld1    =    30    note:  Claudia Stuart suggests holding for 1 hour and peeking, then skipping step when it looks good
rA2    =    FULL
F        =    1004
Hld2    =    1.00
rA3    =    100
F        =    680
Hld3    =    0
rA4    =    200
F        =    110
Hld4    =    0

Normally I would just finish at the third hold and let it cool down naturally but I'm feeling well behaved...

For anyone reading this needing the visual, this is what my kiln looks like:


How to clean sticky pencils that mysteriously "melted" by sitting next to erasers...

bolded summary for tl;dr-

I am putting this out here for anyone on the internet land who finds themselves with the same dilemma as me and chooses to resort to Google for help.  I did not find much help, but at least I was able to understand what was going on.

MY PENCILS MYSTERIOUSLY MELTED
WHY ARE MY PENCILS STICKY
WHY ARE MY PENCILS STUCK TO MY ERASER
WHY DID MY ERASER MELT MY RULER
HOW DO I CLEAN MY STICKY PENCILS
MY PENCIL CASE MELTED WITH MY ERASER

...getting an idea here?  lol...

So, first, here's the answer... Erasers have a substance called plasticizer which makes plastics malleable.  I found this information in these places
When erasers sit next to your plastic coated pencils (all of them basically), or your ruler, or just your plastic pencil case, having them touch will "melt" some of your plastics.
I tried just washing that off of my pencils and letting them dry out, but that didn't work, because the stickiness was not just something on the surface of my pencils, it is the surface of my pencils.  I thought maybe because of something I read on the Wikipedia site (about antiplasticizers) that if I raised the temperature, the plastic would harden (unmelt?) ... that didn't work, it fumed all over my kitchen from just 7 seconds in the microwave, and after that, I didn't bother to try freezing it.  Um... don't put your graphite pencils in the microwave.

What I am trying right now, is coating them in clear nail polish (one that isn't good anymore for a nice manicure but could work for this) and right now I'm waiting for it to dry.  It did work on half of my pencils, but I'm doing a wider coat on the most damaged ones to see if the stickiness will get completely stuck under the layer of polish.  I think it will work and I'll update this post with pictures if it does.  

What can we do to prevent this from happening in the future?  I think if you just keep your eraser in it's wrapper, it won't happen, but I can't be sure.  My pencils were stored there without being used for a while, maybe months or years, and while googling I found people who had this happen with just some weeks... in fact, my new Prismacolor shading pencils came with a melted plastic thing inside.  sooooo I don't know at which rate this nasty chemical reaction happens.  But it seems like rotating things and using them keeps it from happening, I think I will also try making some paper sleeves for my erasers, because I do have lots of supplies that just sit there.  I can't seem to go through them fast enough because I keep changing media, and I love to just have lots of art supplies.  I would have never thought erasers were something to take special care of.

I have no intention of throwing out my still functional shading pencils I bought when I was in college, about 14 years ago, and much less my dead grandfather's old drafting pencils.

Comments?  Questions?  More answers?  Leave them below or contact me through your preferred method of communication.

Gabi the painter

Gabi the painter has been hiding.


When Gabi the painter started this blog in 2009 she didn't really know what she was doing, she needed a place to ramble randomly and didn't like Facebook notes, she wanted a place to post fun pictures and be able to write and do funny things with links... And a place to post fun pictures.


(he will ask me to take this down in 3... 2...)

Gabi the painter had recently graduated from college and was fresh with technical skill and art ideas from the classes she'd taken.  She didn't yet feel like an intruder in her parent's home, and wasn't feeling burned out from the ridiculous work that was ahead of her.  And she painted a few times, and posted about it...
And then Gabi the painter, like, died?  You know, shit happens.


đŸ‘»  But now she's back!  And she's painting.  And drawing.  And she has this new modern thing called "Instagram", with upwards of 500 followers!  Which doesn't seem like a lot but it kind of is.  And is doing commission work, for people who love her work.  Who knew!


And this so-called "art studio" blog kind of returns to it's roots, because I want to paint, and I HAVE NO STUDIO.  Lol.  I'm desperate to go home and have a studio.  But this time, I will actually paint in it, AND melt glass.  Possibly even at the same time!  Who knows.  But I'm back, bitches.

Here's one more pic, because I can.  More on that later.


A brief post on recycled glass...


I was in Panama earlier this month and got to melt some glass!  (Earlier in the blog I wrote about how we were moving to Cali for a year, link)  Unfortunately my plan to set up or borrow a studio in Cali never solidified, but luckily I was able to work at my parent's house both times I got to visit.  I'm very happy because we return home in July and my studio will be back up as it should be!  Hopefully even more glorious than before.  In any case... inspiration struck with the bottle glass this time!

I just thoroughly searched my blog and realized I have barely posted about recycling glass bottles, though it's something I have done that is pretty cool.  When I first tried it (linked above), my hothead torch just wasn't hot enough for melting bottle glass.  The thing is that in Panama we use a propane-butane mix, for some reason, probably money, which is not as hot as full-on propane - as it should be.  In any case, the torch I have now is perfect for melting this kind of glass, which is more rigid than the coe 104 Venetian glass that I usually use.  

The first step in using bottle glass is to crush the bottles.  Which commonly come in beautiful emeraldish green, amber, and cobalt blue.  Of course the most common is clear teal and transparent is also readily available, as well as other shades of green, amber, and blue. 


The thing with bottle glass is that when the bottles are made, the manufacturers don't care about glass compatibility, or coefficient of expansion, which makes or breaks whether you can mix glasses or not.  So I can't really mix colors or even similar bottles; I use only glass from one particular bottle at a time.  In the picture above, the jars are labeled with the bottle of origin.  Green and amber are two favorite Panamanian beers, and Saratoga is a water brand... don't get me started on bottled water, but at least I am recycling the bottle, which was large.  I have more glass of course, but these are the ones I decided to work with.  


This time, I made mostly big holed beads, which are the ones that fit on collectible charm bracelets such as Pand*ra, and stud earrings that I need to attach the backs to, soon.  
To hold the shards of glass, since they are not rods, I am using a Carlo DonĂ  tool... which I am absolutely in love with... 
And here are some morning pictures after the kiln.  Pretty soon these items will be available for sale on my Etsy store.


I really enjoyed practicing how to make this shape completely by marvering.


Recycling is:  diverting pre-consumer or post-consumer material from going to the dumpster, and instead turning it into a completely new product.  Recycling is NOT the same as reusing or repurposing, because of the word cycle.  
By crushing and melting the glass bottle, I am making something completely new.  In this case, just one bottle can make hundreds of beads, rings, and other lampwork items.  Ideally, these bottles should just be washed and reused, but we know that getting this to actually happen can be complicated, especially in "our countries"... 
I am in no way saying that I am saving the earth by making glass jewelry - I'm just explaining why this is considered a recycled product.  

Love.